This is an updated and shorter version of the previous article How Windows 10 Pro installs unwanted apps (Candy Crush, Twitter, Minecraft, Flipboard, Photoshop Express, …) and how to stop it.
By default Windows 10 Pro and even Enterprise advertise and install unwanted apps, such as Candy Crush, etc. There are many guides on how to stop Windows 10 from doing so, but most of them are not recommended in a business environment or simply won’t work (see previous article). In this article I will describe how to prevent Windows 10 from advertising or installing unwanted apps in a clean and reversible way.
How Windows 10 installs unwanted apps
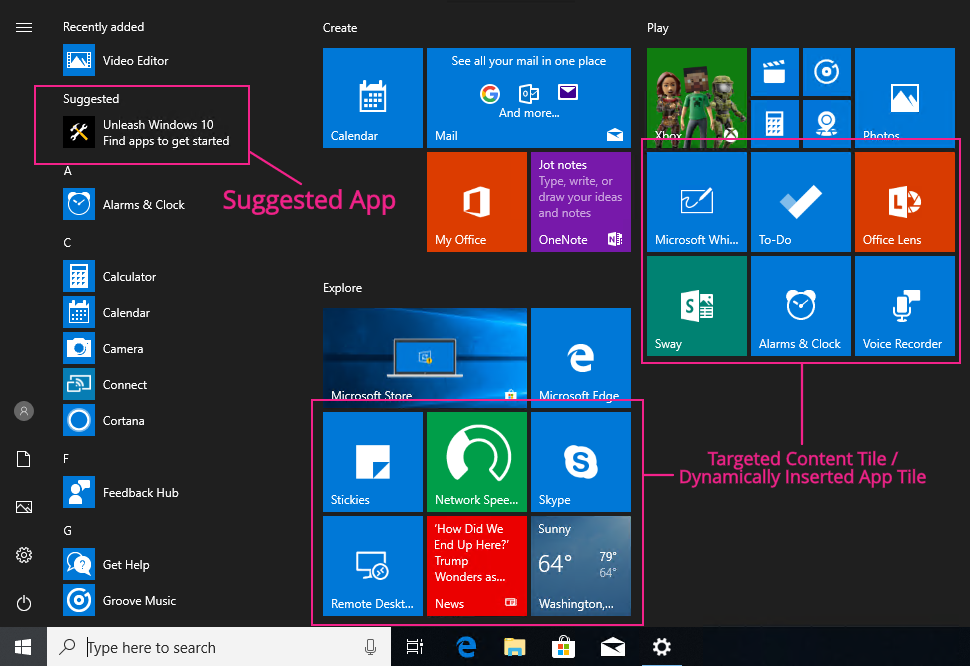
Before we begin I’d like to explain how Windows 10 installs those bloatware apps and clean up with a common misconception: Windows 10 does not ship with Candy Crush or other unwanted bloatware apps. They are not included on the disc, in the ISO or most OEM computers. Instead, they are downloaded by a special tile in the start menu named Targeted Content Tile or Dynamically Inserted App Tile.

When you sign in the first time on a new computer, Windows will create the Start menu layout from a template saved at C:\Users\Default\AppData\Local\Microsoft\Windows\Shell\DefaultLayouts.xml. The file contains multiple layouts and Windows chooses a layout based on the edition (SKU), region and computer settings. If you take a look into the file, you’ll see a number of <StartLayout> elements. Our goal is to have Windows choose a layout without Targeted Content Tiles or Dynamically Inserted Content Tiles. Basically every <StartLayout> template with either the attribute PreInstalledAppsEnabled="false" or without the attribute TargetedContentTilesEnabled="true".
The first time you click on Start after signing in – provided you have internet access – the Targeted Content Tiles then query Microsoft for the content they must display. The tile will then preload or install the app.
Getting rid of the Targeted Content Tile
To conclude the previous section, the only thing you really need to do is to get rid of the Targeted Content Tile in the Start menu. You can do this in multiple ways. Some of them only work with the Enterprise edition. But they have in common that the settings must be set before the user signs in the first time.
Via Group Policy
Change the following setting to Enabled:Computer Configuration/Administrative Templates/Windows Components/Cloud Content/Turn off Microsoft consumer experiences
This also deactivates Suggested Apps in Start.
Works only with Enterprise or Education editions. Run gpupdate or restart your computer after the change.
Via Registry
Load the Default user’s registry and change SOFTWARE\Microsoft\Windows\CurrentVersion\ContentDeliveryManager\PreInstalledAppsEnabled to 0.
New-PSDrive -PSProvider Registry -Name HKU -Root HKEY_USERS
reg load HKU\DefaultUser "C:\Users\Default\NTUSER.DAT"
$regHKUPath = "HKU:\DefaultUser\SOFTWARE\Microsoft\Windows\CurrentVersion\ContentDeliveryManager\"
Set-ItemProperty -Path $regHKUPath -Name PreInstalledAppsEnabled -Value 0
# You can also set OemPreInstalledAppsEnabled to 0 if you like.
# Set-ItemProperty -Path $regHKUPath -Name OemPreInstalledAppsEnabled -Value 0
reg unload HKU\DefaultUser
Remove-PSDrive -Name HKU
Code language: PHP (php)This works with all editions. You can apply the script to an offline image, just make sure you change the $profile variable to point to the mounted image’s default user profile.
Manually
On existing user profiles, simply right-click all Targeted Content Tile and choose Uninstall. Alternatively you can uninstall all unwanted apps via Settings > Apps.
Suggested Apps
Disabling Suggested Apps works also for existing user profiles.
Via Group Policy
Change the following setting to Enabled:Computer Configuration/Administrative Templates/Windows Components/Cloud Content/Turn off Microsoft consumer experiences
This also removes Targeted Content Tiles in Start for new user profiles.
Works only with Enterprise or Education editions.
Via Registry
Load the Default user’s registry and change SOFTWARE\Microsoft\Windows\CurrentVersion\ContentDeliveryManager\SystemPaneSuggestionsEnabled to 0.
New-PSDrive -PSProvider Registry -Name HKU -Root HKEY_USERS

reg load HKU\DefaultUser "C:\Users\Default\NTUSER.DAT"

$regHKUPath = "HKU:\DefaultUser\SOFTWARE\Microsoft\Windows\CurrentVersion\ContentDeliveryManager\"
Set-ItemProperty -Path $regHKUPath -Name SystemPaneSuggestionsEnabled -Value 0
reg unload HKU\DefaultUser

Remove-PSDrive -Name HKU
Code language: PHP (php)
This works with all editions. You can apply the script to an offline image, just make sure you change the $profile variable to point to the mounted image’s default user profile.
Manually
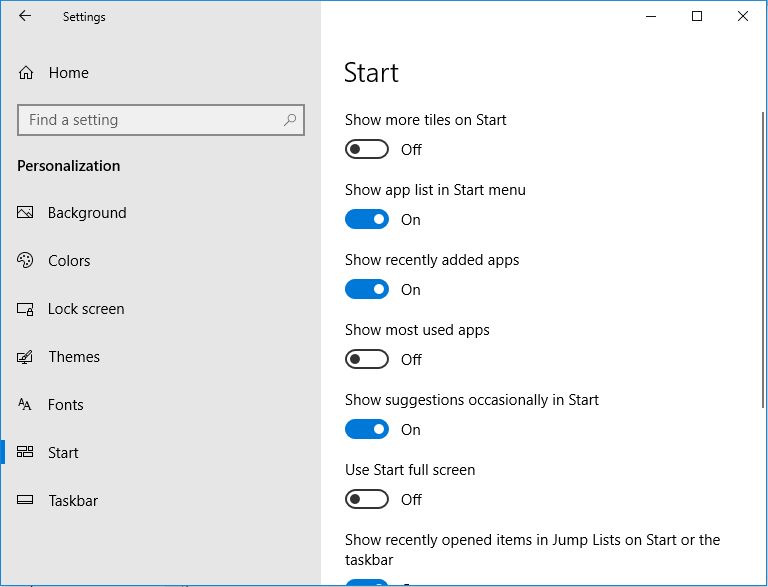
On existing user profiles, go to Settings > Personalization > Start and disabled Show suggestions occasionally in Start.

Leave a Reply